Repair and Refinishing: Dining Room Hutch
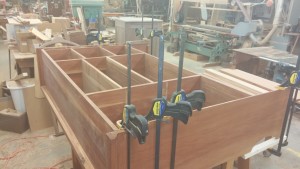
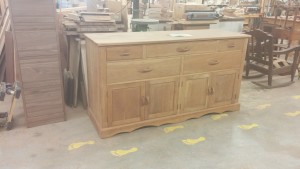
Recently a couple contacted us here at Schanz Furniture to see if we could repair and refinishing their cherry hutch. They informed me that it was built many years ago using cherry trees from their family farm. Without seeing the piece, I gave them an estimate over the phone and arranged a time to pick it up. The hutch was very large, 24″ deep and 7 foot long, so I knew it was going to be difficult to move and work on. The first thing to do was remove the glass and have the entire piece stripped with a chemical stripper to remove all the old finish. The owners wanted us to repair the back panels as well as to make two new center doors for the top the hutch and then refinish it with our hand rubbed satin varnish. The back panel of the hutch had split in several places due to expansion and contraction of the solid wood over the years. The main reason it did this was because the entire 7 foot back was glued together as one piece across the back. To fix this I had to remove the back and cut all the boards apart at the glue joints. I then ripped a saw kerf on each butting edge of the boards and put a floating spleens in to cover the gap between the boards. I then screwed the boards to the back, leaving a small space between each board for expansion and contraction. Each board was also chamfered 45 degrees on each side to make a finished panel back. Next, in the center of the hutch top were two shorter doors which the customers wanted to be made the same length as the two outside doors. I was able to reuse the two carved handles and the hinges from the shorter doors on the two new longer doors. The pictures above and below show the base of the hutch and the top being repaired in our shop after the stripping process.
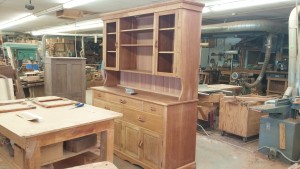
In repairing furniture we try our best to match the existing wood, so we used older cherry wood that has an aged look. The next task was to make two new center doors for the hutch top. Since the new doors were larger, new glass was cut and installed before delivery. Finally the last part of the repair was to sand each drawer and door edge to make sure they fit properly. All small nail holes and voids in the wood were filled and the hutch was ready to head to the finishing room.
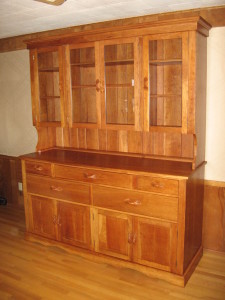
Since this hutch was solid cherry wood and had a naturally aged patina, we finished it with a clear satin varnish. There was no need to stain this piece to achieve its beautiful color. Before the varnish can be sprayed on, the entire hutch needed to be sanded, by hand, using 100 grit sand paper. The first coat of finish was an oil based varnish sanding sealer. After drying for several days, the entire piece was then hand sanded to smooth out the finish in preparation for the next coat. The second coat was a clear varnish top coat with a satin sheen. After that had dried for several days, the hutch was sanded again using a finer sand paper in preparation for the next coat. The third coat of finish was the same clear varnish top coat. Once dry, the top surface of the hutch bottom was then sanded, and received a fourth coat of finish for added protection. The final sanding takes place, and it is then rubbed by hand using a super fine steel wool until the finish has a satin sheen. The last step of the finishing process is wiping the hutch off with a lemon oil to remove the steel wool dust which brings out the beauty of the grain of the wood and finish. Below is a picture of the finished project delivered and set up in the customer’s home.
If you have an antique piece of furniture that needs repair or refinishing, please do not hesitate to email us with a picture or call us at 319-622-3529. We specialize in making new hand made furniture and restoration of quality pieces.